Product Description
Touch off plate with code
Touch of plate in aluminum to calibrate both height and corners. The plate comes with code for install in Mach3.
We also include a simple cable connector (male and female crimp) that you can use if you don’t have any connector for the plate.
The video below shows a plate with 2 calibration holes, we have changed that to only one hole since the second hole is not needed.
We have updated the touch off plate, or zeroing plate so that you can zero all axes to find your absolute zero point. Previously, we could only zero the height but now we can also zero the X and Y axis.
To zero the X, Y and Z axis you must have a 4mm or 3mm end mill. Do not start the spindle when performing this operation! Lower the end mill into one of the holes so that they are approximately 2-3mm below the hole. Then click on the “Auto tool Zero” button and choose from 3 options, 0=cancel, 1=Calibrate corners and height, 2=Calibrate the height. For option 1, The machine will calibrate all axis so wait until it has calibrated the Z-axis as well. Once the steps are done you can press “Go to Zero” and the machine will go to its Zero point.
Why is it good to have an absolute zero point?
If you want to cut into an already existing material and have a hole exactly in the center for example, it would be very difficult to find it manually. If you have an absolute zero point, then the machine knows exactly where it is and will find the center over and over again. As a carpenter, you have templates to do this, so the zeroing plate works a bit like a template telling the machine where the piece starts. As an example, if you draw a square and a hole exactly 10 cm away from the corner of your square, then the touch off plate, or zeroing plate will tell the machine where the corner begins. It would be difficult to manually place the end mill above the corner and therefore we use this plate. If you used the corner calibration when you started to cut you will be able to go back even if you have a power faliure.
How to install
If you have a kit from us we usually include the cable for the probe (Auto tool). If not, you can have any 2-lead cable you like, it doesn’t have to be shielded, it will only work as a switch. You can only use the code provided for Mach3, it probably works for Mach4 too, but we have not tested it yet.
Fasten one of the cables to any switch port of the break out board and the other to ground. Pull the wire trough your cable chain all the way to your spindle. One of the cables cords must be grounded to the spindle. If your spindle is made of plastic, you can use a crocodile clip that you temporary fasten to the endmill. The touch of plate works as a switch and when the two cords of the cable touch we have contact.

Set up the software
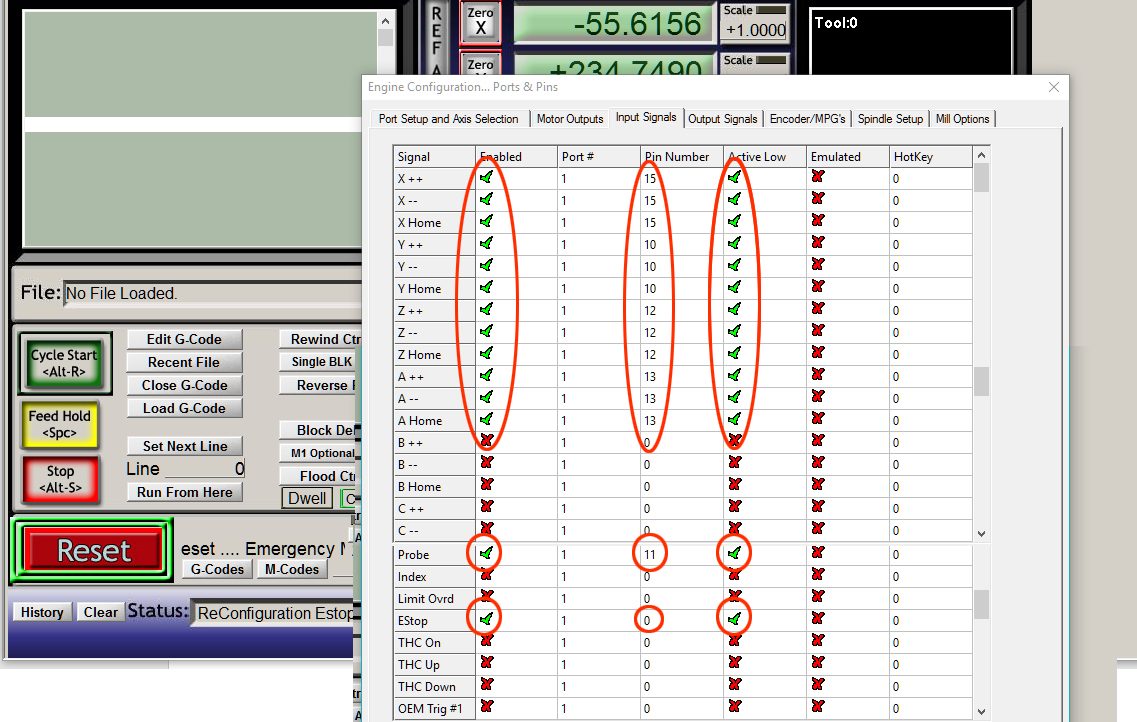
We need to assign a port for the probe (touch off plate)
In Mach3, go to Config / ports and pins.
 Ignore all other pins in the image above, we only need to set the probe.
Click on “Automated setup of inputs” and select probe and click Auto Set. What’s happening now is that the program is waiting for you to connect the two cords (cables) so that it can locate which pin it is plugged in to. Connect the two cords of the probe (auto tool) wire, dont worry it’s low current and safe. If everything works, then the program will find a location for the probe.
When you are done, click ok.
If you exit Mach3, you lose the settings so you have to save them, go to the “Config” menu and “Save settings” at the bottom.
Install the code
- In Mach3 click Operator / Edit Button Script
- A few buttons will blink. Click on the flashing button “Auto Tool Zero”
- A white box opens and this is where you erase everything and paste our Auto Tool Code
- Save!
If you exit Mach3, you lose the settings so you have to save them, go to the “Config” menu and “Save settings” at the bottom.
We are done, look at the video for more details.


